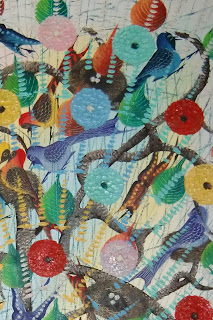
We have an old painting hanging in the dining room, and my kids love it! They call it the "peacock" painting, and look at it while drawing or painting at the table. My youngest likes to point to the picture and say, "I see "blue" "red" and name all of the colors.
We've had many conversations about the birds in the painting, and they love to make up stories about them, and "tweet" for them! Come to think of it, between Breakfast, Lunch and Dinner, and snacks every day, plus using our (indestructible) table for arts and crafts projects, we spend a lot of time with this painting!
This colorful painting even inspired some the choice of some crazy polka-dot vinyl fabric
when we were re-covering our dining room chairs!
And now, finally, it has inspired a sewing project!
It's a heavily embellished hooded sweatshirt for my little girl! The flowers on the back are really a collage, with bits from many different fabrics in my stash, and I added pom pom fringe along the hood and front pocket. This was really simple to do - if you're interested in trying one, here are a few tips!
- Cut out your flowers or appliques a little larger (about 1/4") than what you want to show, this way you'll have more options when laying them out to make your collage. It also helps to have the extra room so you don't cover up the image when stitching around them.
- Use "Steam - a Seam" to adhere your pieces to the shirt. There are lots of different kinds of "iron on" products to adhere the fabrics to your shirt, but I really steam-a-seam for 2 reasons: it comes in 8.5x11" sheets, so it is easy to work with and store, and it is sticky (and RE-stickable) on BOTH sides, so you can "stick" your appliques onto your shirt and reposition it as needed until you like your composition, before ironing, and it won't move on you! Once you iron it on, it's there forever and seems to hold up very well through multiple washings.
- Steam-a-seam tape (in narrow "hem" strips) really helps with the pom-pom fringe. Once you've ironed it on, it is much easier to stitch it, since you're not working so hard to hold it in place! I imagine that my daughter will pull on the fringe a bit, so I wanted to sew this on just to reinforce it. I always like a little extra "insurance" because I only want to make it once!
- Use colorful embroidery floss and go to town! I tend to follow seam lines for decorating these, but of course you could do much more (or less) if you like! This is only the 2nd thing I've ever embroidered and the stitches aren't even, or especially well-made. But they really add a lot to the shirt, and were fun to do. Very easy!
I would LOVE to see what you come up with! If you make one, please send a picture or link!!!


No comments:
Post a Comment