Monday, November 28, 2011

Rapunzel dress

So I finally did make a princess dress from my stash of Heather Ross's Far Far Away 2 line.  This is the Oliver and S Ice Cream Social dress, with a little yellow and white polkadot print on the shoulder, and some coordinating pink velvet ric-rac at the seam just to punch it up a little.
I really like this style dress for a little girl, and especially loved the ones I've seen on Flickr where they used all one fabric/print instead of color-blocking it.  My only problem was that the shoulder is cut as one continuous piece front and back, so Rapunzel and her tower would have been upside down on the shoulder in the back had I used that print for the whole dress without altering the pattern.  But I still love how it turned out, polkadots and all!


  Lainey loves to wear her new dress - so I imagine I'll be making a few more of these.  First, I really want to try out a couple of O+S patterns I haven't used yet....  everyone raves about these patterns, and now I can see why. 

Love that twin needle!


They seem to be kind of a cross between the standard sewing pattern and a boutique pattern...  not nearly as annoying and unhelpful as the standard pattern, and not quite as long-winded as some of the other boutique patterns I've tried.  Really a good balance for the "intermediate" sewist.  And while it's not a "quick sew" it really does come out nicely, with the inside looking almost as good as the outside, and some nice details, like the notched pockets. 


Friday, October 7, 2011

Reinterpreting the pink princess

Does anyone else get a little tired of the pink princess theme?  I love pink and purple and princesses and sparkles and glitter and fairies and rainbows and unicorns and happily ever after as much as the next girl, but I just can't quite bring myself to actually buy or sew with cheesy pink princess fabric. 

But my little girl LOVES pink princesses and wants a pink princess dress.  And a pink princess school bag.  And a purple princess dress.  Etc...  so I'm always trying to dream up ways to reinterpret the theme and make things "pinkalicious" enough to capture her imagination while still appealing to my sense of style.  So, a big "Thank you" to Miss Heather Ross, for designing Far Far Away 2, the ultimate princess collection of fabrics, done in a sophisticated color pallate that still incorporates the all-important pink and purple. 

After hoarding this fabric for quite a while, too anxious to actually cut into it and make anything, I finally made a few skirts, which I'll show you if I ever get it together enough to take a picture while she's actually wearing it!  More recently though I made a tote bag - inspired by Lainey's recent slew of princess drawings.  I love how she's so proud of her artwork, and likes to explain what she's drawn, and tell us little stories about the people in her pictures. 


She was "just a little bit blue in her face."


"She is purple and blue.  Her crown is TURQUOISE."  Not blue.  Not Green.  Turquoise.  Thank you very much!  And "it sits on TOP of her hair!" 

My favorite simple tote bag tutorial is this one  from Skip to my Lou.  It's not only lined, but fully reversible, and I love to sew things that are finished so well they are as nice on the inside as the outside.  I didn't make my tote the same dimensions - but otherwise followed her instructions.  

The larger areas are appliqued wool felt, and the detail work is embroidered.  I added in Lainey's signature too, and "08/11" so we'd have the date. 

In just this past month, Lainey's preschool teacher taught her to make her "E's" stand upright, instead of laying down and napping.  (We both LOVE Miss Kim and Debbie)! 

I photocopied and reduced the two drawings that inspired the design element on this bag, and made a little laminated tag that is sewn into the bag in lieu of a name tag!  Lainey loves to point out how she made it, and mommy made it.  What a fun way to collaborate w/ my daughter!  And to preserve a tiny bit of her voluminous artwork! 

So, where's the Heather Ross Princess fabric in all of this?!!  The lining!  It is this gorgeous purple sleeping beauty print.  Now to get really brave, I'm going to try making a Far Far Away 2 "princess dress" using the  Oliver and S Ice Cream pattern for the first time.  Wish me luck!

Friday, September 30, 2011

A quilt for Jack

Yay!  I finally finished Jack's quilt!  It is just like Lainey's, made with patchwork squares cut from his baby clothes, with a minky backing to keep it soft and light.


It was so much fun to go through the giant piles of tiny little baby clothes and decide what to cut up for his quilt.  And I used lots of little extras, like buttons, pockets, and patches too. 


A little onesie from Aunt Ann, who is known for finding gifts with people's names on them!


A patch from his first pair of "COOL" jeans, and the little crab from the outfit he wore in his birth announcements!


Little pockets for any treasures he collects...


A little bit of hand embroidery (not my specialty)!  I hope Jack knows how loved he is, every time he cuddles up with his new quilt and drifts off to sleep. 

Friday, September 9, 2011

The mail must go through!!!

We all got new shoes recently, and as the shoeboxes began stacking up, I got inspired to make something out of them.  What does one make with a bunch of empty shoeboxes, you ask? 

I'm so glad you asked!

I spraypainted them out on the driveway (got some funny looks from the neighbors), and turned them into mailboxes for Dog, Cat, Fish, Bird, Frog, and Pony. 


Why, you ask? 

I thought it might be fun to make a matching game for my little ones - with pictures, words, and numbers!  So once the mailboxes were labeled, I made letters and postcards for them to deliver.


And what do our little mail carriers use to haul the mail around to all of the mailboxes?  Why, mail bags, of course! 


I used Skip to my Lou's reversible tote bag tutorial, with a rainbow home-dec weight material and a bandana as the lining fabric.  

So much fun!!!  I hope they'll like playing with it!  And, the song is stuck in my head!  The mail must go through.... no matter if it rains or snows, the mail must go through!  No complaints though, it replaces "In the garden of vegetables" as the current "stuck in my head" selection, and none to soon either! 

Happy mailing!


Wednesday, July 13, 2011

Thank you Alicia Paulson


Find Alicia's book here.

I never would have made a quilt if it weren't for Alicia Paulson.  There are lots of great projects in her wonderful book, "Stitched In Time," but the one that caught my eye was the baby quilt.  I think what really got my attention was that she made it seem simple, and unintimidating.  Completely within reach, even for someone new to sewing and quilting. 

Thank you Alicia Paulson!  I'm so happy that my little girl gets to snuggle up and sleep with a handmade quilt from her mommy, made from some of her most-loved baby and toddler clothes!  And I get a little trip down memory lane, without digging into garbage bags of old clothes hidden up in the attic! 


It was a lot of work, cutting up the clothes, cutting the squares, stabilizing the knit fabric squares, fusing and top-stitching the small squares (from fabrics that weren't big enough to yield 6.5" squares) onto the larger ones, piecing it all together, quilting, binding... but it was so worth the effort. 

This was made slowly, over a few months time.  There were a few interruptions - other projects to make, little ones to care for, boo-boos to heal, a business to run, birthday parties to plan... you know the drill! 

More than once I made a detour to the baby album, just to remember what she looked like when she wore the little pink and green turtles print, the newborn romper with smocking, or the shirt with the little cupcake applique. 


It's really a kind of functional scrapbook.  Full of memories and love.


Lainey and I went to the fabric store together to choose the backing fabric, a hot-pink super-soft minky.  I love how the whole quilt is light as a feather, and whisper-soft, more like a light blanket than a heavy, stiff quilt.  Perfect for a little girl!


A little pocket for her treasures!

I hope that she grows up knowing how special she is, and how much her momma loves her!

Tuesday, July 5, 2011

Another rag rug

Long time no talk, right?!  Well, first, look at these gorgeous flowers!!!  They sit on the dining room table and smell so good, and make me smile every time I walk by. 


I've been crocheting again... making a new kitchen rug.  Tried to use up all of the fabric that's was purchased with best intentions but just didn't quite work out.  (Read: make room in stash closet for some of the new fabrics I've fallen in love with)!

So, hopefully you won't think that some crazy crocheting clown has taken over around here, because I warn you, it is a LITTLE bit colorful. 


It's broad stripes, of multiple fabrics cut in 2" strips of "yarn," starting with turquoise, green, brown, yellow, purple, white, red, and brown again.  I crocheted along a thick off-white yarn with the fabric as well, for some texture. 


 It's a little crazy, but fits right in with the rest of my kitchen/children's art gallery!


The wacko decor of this whole room makes me feel as happy as the flowers do!

Wednesday, June 15, 2011

NOOOOOOOOOOOOOOOOOOOOOOOO!!!

Dear wise readers,


This morning we woke up to this mess!  All of the clothes from the closet and dresser, plus all of the books and toys dumped into a huge pile on the floor.  And baby Jack's first words to me this morning  were, "Lainey did a mess!"  He then proceeded to joyfully play in said mess, while his sister protested, "we BOTH made the mess." 

Suggestions?  Advice?  Sympathy?
All of the above?! 

Sincerely,
OneTiredMama

Monday, June 6, 2011

The Entry

I've been threatening to make a rug for our front entryway for about 5 years now.  Pretty much ever since we moved in.  Periodically, I'll go on a shopping quest, where I'll look in local shops, scour the internet, and mention it to my mom, sister, and best friends incessantly....  but I have had no success in finding the right rug. 

Am I picky?!  Yes!!!  I wanted something in white or off-white with a dash of light tan or something, and oval shaped.  So I'd look all over, and then threaten to make one, and then just live with the little square piece of carpet that they cut for us last time we got new carpeting.  Ugh! 

I mean, who in there right mind would MAKE a RUG?!!!  Well, it turns out that people all over blogland do, and they even give ideas and tips on how to do it yourself!  Yeah!!!  Five years is a long time!   Maybe I should have done this long ago?!!!  Ugh! 

So apparently there are a few different ways to make a rug, but mostly I saw them either braided, or crocheted.  Since you'd have to actually sew a braided rug together, and I don't like trying to sew through big heavy thick stuff too much, I decided to crochet mine and avoid that hassle! 

I used off-white cotton knit fabric, with a thick strand of yarn (with a copper thread) along with it, and crocheted this with a GIANT hook.  It took about 9 yards of fabric, cut into a continuous 2-3 inch strip.  To cut it, I started from one end, and cut a (approx.) 2.5" strip, stopping about 2" from the end.  Then I moved my scissors over 2.5" and started cutting a parallel strip from the other end.  I repeated this process until the entire yardage was cut in a continuous strip.  (See figure below, where the dotted line is the cut line, and the red dots are where I stopped cutting). 


So, it took about 4 hours to make this.  I started with a chain of 5-6, and then went around and around, increasing every few stitches, in order to make it lay flat.  If you don't increase enough, it starts to curl up into a bowl shape, and if you increase too much, it will be wavy and rippled, so you have to keep trying and see what works well.  (And ripping out stitches as needed)!  I only stitched into the front hook of each chain, to make it less rigid. 


It sure felt good to throw out that old scrap of carpet!   Next I think I'll work on something new for the kitchen!!!

Saturday, May 28, 2011

A Crown for my Princess!

I loved the idea of a birthday crown, for my daughter to wear to her 4th birthday party. The theme of the party was Rapunzel, and we invited all of her preschool friends to celebrate at the park. Our special surprise was an entertainer, who dressed up as the "real" Rapunzel, and led the kids in lots of fun party games. She was amazing! And the little girls "oohed and aahhed" over all of the flowers in her long hair!  Three and four year olds are just adorable!

So, here is a copy of the invitation... I used MS Paint to do the "spray painted" background, and then cut the tower out of scrapbooking paper.  That's ric-rac and a yellow button on the roof of the tower, and pink yarn braided to make Rapunzel's hair.  Why pink, you ask?  Because according to my little girl, if it's not purple, then it should be pink!  And I had some pink!  Yay!  Then I used a zig-zag stitch to make a border on 2 sides.  All of the info is on the other side...

"Hear ye, hear ye, Lainey is turning 4!  Please help us celebrate the royal occasion with a party...  RSVP to the Queen"   

The Rapunzel theme was inspired by our then-current favorite book, "Falling for Rapunzel," by Leah Wilcox.  It's an adorable modern twist on the Rapunzel story.  Leah Wilcox is one talented lady!  We love her "Waking Beauty" book too. 

Instead of giving typical treat bags, we got a paperback copy of the book for each child as their "take home" treat!   I always get a sinking feeling when we leave the birthday party and I know I have to check through the treat bag for junk I'd rather not let my little munchkins have, and then dispose of it when they're not looking... so I LOVED the idea of getting them one nice thing instead of a bag full of junk.  (Not that they don't love the junk)!

I'm hoping I can find a way to theme out our future parties based on books... I think it worked so well, and made it pretty easy to keep everything in line with the theme. 

So what about the Birthday Crown?!  There is a great tutorial on The Long Thread blog (which I love to read)!  And I pretty much followed her instructions, except for adding in some extra rows of velcro to make it a little bit adjustable.  I loved that it was so pretty on both sides, and easily dolled up to suit any princess - or prince for that matter! 


I added rows of ribbon, lace, ric-rac, fabric flowers, felt heart shapes, buttons galore, and little crocheted flowers to decorate it!  'Cause this was one of those times where more really is more - even if it means spending over an hour sewing on little yahoos and doo-dads! 

Happy Birthday little princess!  Your mommy loves you!

Tuesday, April 12, 2011

Beach blanket rollup

I don't remember being much of a picnic person before having kids.  I guess it sounded vaguely good, but not so good that I actually made the effort.  But with kids, it is one of my favorite things to do on a nice day.  We get some time playing outside, and eat lunch.  Leaving all of the crumbs at the park/beach is a nice little bonus too! 

And now we finally have a great picnic blanket to take along with us.  It's DONE!!!  The ugly burgandy thing is no more!  Now it looks like this!


It still lives in my car, but now we'll actually take it out and use it! 


Tuesday, April 5, 2011

Trash to Treasure

So this ugly thing has been living in the back of my car for a long time.  It has never been used!  I don't like it much, but couldn't quite bring myself to throw it out... it's a dark burgandy colored down throw.  Nothing bad or offensive about it, but I can't say I "like" it either...  So I threw it into the back of the car, and ignored it.  For a long time.  

Years!


And now I've FINALLY figured out what to do with it!  Use it as quilt batting to make a beach/picnic blanket. 

I'm so excited!  We could really use one of those!  And the down batting will make it a little extra cushy. 

So hopefully I haven't put my foot in my mouth... because surely I didn't buy this!  It must have been a gift from someone... hopefully a forgiving someone who loves me and has a sense of humor!  Who gave me a lovely 40" x 60" bit of inspiration! 

OK, this is my version of a "cliffhanger!"  Check back in a few days to see the transformation! 

Wednesday, March 30, 2011

The story behind M is for milk

Princess Jennifer
Not so long ago, in a land far, far away (Florida), lived a fair princess named Jennifer.  She worked in the Financial Services industry, and was very career-oriented.  One day, the busy princess met a handsome prince named Tim; it was love at first sight (well, within a few dates!). 

After marrying, they decided to start a family, and soon had two beautiful children.  But there was trouble in paradise – the burp cloths and bibs they were able to find for their adorable little babies were all either too small or thin, didn’t provide coverage around the neck, were too easily pulled off, or simply weren’t cute enough. 

What was a princess to do?  Cry over spilt milk?   Never!!! 

She learned how to sew, of course, and designed a better bib and burp cloth, with all of the practical qualities parents need along with the style they want.  And this is how "M is for milk" came to be.  Princess Jennifer left her job in Finance, to become a full time “mom-preneur.”  (And they all lived happily ever after).

M is for milk:  Stylish accessories for modern babies and practical parents who love them!  From our family to yours...

Find our hand made items on Amazon by clicking here!

Monday, March 28, 2011

Take a deep breath.... and hit "Publish Post!"

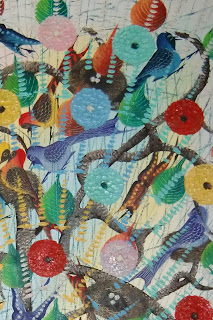
We have an old painting hanging in the dining room, and my kids love it!  They call it the "peacock" painting, and look at it while drawing or painting at the table.  My youngest likes to point to the picture and say, "I see "blue"  "red" and name all of the colors. 

We've had many conversations about the birds in the painting, and they love to make up stories about them, and "tweet" for them!  Come to think of it, between Breakfast, Lunch and Dinner, and snacks every day, plus using our (indestructible) table for arts and crafts projects, we spend a lot of time with this painting! 

 
This colorful painting even inspired some the choice of some crazy polka-dot vinyl fabric
when we were re-covering our dining room chairs!  


And now, finally, it has inspired a sewing project! 


It's a heavily embellished hooded sweatshirt for my little girl!  The flowers on the back are really a collage, with bits from many different fabrics in my stash, and I added pom pom fringe along the hood and front pocket.  This was really simple to do - if you're interested in trying one, here are a few tips!

  • Cut out your flowers or appliques a little larger (about 1/4") than what you want to show, this way you'll have more options when laying them out to make your collage.  It also helps to have the extra room so you don't cover up the image when stitching around them.

  • Use "Steam - a Seam" to adhere your pieces to the shirt.  There are lots of different kinds of "iron on" products to adhere the fabrics to your shirt, but I really steam-a-seam for 2 reasons:  it comes in 8.5x11" sheets, so it is easy to work with and store, and it is sticky (and RE-stickable) on BOTH sides, so you can "stick" your appliques onto your shirt and reposition it as needed until you like your composition, before ironing, and it won't move on you!  Once you iron it on, it's there forever and seems to hold up very well through multiple washings.

  • Steam-a-seam tape (in narrow "hem" strips) really helps with the pom-pom fringe.  Once you've ironed it on, it is much easier to stitch it, since you're not working so hard to hold it in place!  I imagine that my daughter will pull on the fringe a bit, so I wanted to sew this on just to reinforce it.  I always like a little extra "insurance" because I only want to make it once!   

  • Use colorful embroidery floss and go to town!  I tend to follow seam lines for decorating these, but of course you could do much more (or less) if you like!   This is only the 2nd thing I've ever embroidered and the stitches aren't even, or especially well-made.  But they really add a lot to the shirt, and were fun to do.  Very easy!
I would LOVE to see what you come up with!  If you make one, please send a picture or link!!!